Bolted Joint Analysis
The bolted joint is among the most common joining methods -- other common joining methods include riveting, welding, press fits, pins, keys, and adhesives. The primary components of a bolted joint include the threaded fastener as well as the parts to be joined together (the clamped parts). The bolted joint works by inducing an initial clamping force ("preload") on the joint by threading the fastener into either a nut or into threads that have been tapped into one of the parts. This preload ensures that the clamped parts remain in contact and in compression throughout the life of the joint.
Washers are typically used in the joint and serve many purposes. They minimize embedment of the bolt head and nut into the clamped parts, and they aid in tightening. Since bolt holes could have sharp edges or burrs, washers are used to protect the fillet under the bolt head from scratching since this is a critical area that is prone to failure. Washers also serve to distribute the preload and applied force over a larger area, both on the bolt head and on the faces of the clamped parts. This reduces bearing stresses, helps to prevent pull-through, and helps to prevent damage to the surface of the clamped parts.
Contents
Thread Dimensions
When analyzing a joint, it is necessary to know the characteristic dimensions of both the external thread and internal thread. A thread size is specified based on a nominal (major) diameter and either the number of threads per inch (for unified inch threads) or the pitch (for metric threads). The thread sizes for coarse thread and fine thread can be found in tables located in any standard machine design handbook, as well as in the thread size tables in the Appendix. The pitch, P is the distance between the threads. When the pitch is in units of inches, it is related to the threads per inch, TPI, by:
Thread Dimensions (Internal and External Thread):
| Symbol | US Units | SI Units | |
|---|---|---|---|
| Nominal (Major) Diameter | dnom | in | mm |
| Threads Per Inch | TPI | in-1 | --- |
| Pitch | P | in | mm |
The tables below provide equations for some of the thread profile dimensions of interest for both unified inch threads and ISO metric threads. In the case of metric threads, the thread profile is based on a parameter H, the height of the fundamental triangle. The value of H is related to the thread pitch, P by:
External Thread (Bolt) Dimensions:
| Equation, US Units [in] | Equation, Metric Units [mm] | |||
|---|---|---|---|---|
| Minor Diameter |
|
(Shigley) |
||
| Pitch Diameter |
(ASME B1.1, Section 10.1p) |
|
Internal Thread Dimensions:
| Equation, US Units [in] | Equation, Metric Units [mm] | |||
|---|---|---|---|---|
| Minor Diameter |
(ASME B1.1, Section 10.1s) |
|
||
| Pitch Diameter |
(ASME B1.1, Section 8.3) |
|
External Thread (Bolt) Areas:
| Equation, US Units [in] | Equation, Metric Units [mm] | |||
|---|---|---|---|---|
| Nominal Area |
|
|
||
| Tensile Stress Area |
(ASME B1.1, Appendix B) |
(ASME B1.13M, Appendix B) |
||
| Minor Area (Shear Area) |
|
|
In the tables above, US units are in inches and metric units are in millimeters.
Preload
Bolts are installed with a preload that ensures that the joint members remain clamped and in compression throughout the life of the joint. Preload is also important for joints with a cyclically applied load. The preload will increase the mean stress, but it will reduce the alternating stress.
Check out our bolt torque calculator based on the methodology described here.
Preload Values
The preload is commonly specified as a percentage of the bolt material's tensile yield strength, Sty. To calculate preload force as a percentage of yield strength, use:
where %yld is the preload percent of yield, Sty is the yield strength, and At it the tensile stress area.
In general, the preload force should be no less than the maximum tensile force that will be applied to the joint. This will ensure that the clamped parts always remain in contact and in compression. Because some of the tensile force applied to the joint will act to relieve compression in the clamped parts, the joint will separate at a value of applied force that is somewhat higher than the preload. This will be discussed in a later section.
Because the tensile force that will be applied to the joint dictates the required preload, then the maximum utility is obtained from a bolt by preloading it to the highest possible value. The ductility of the bolt material dictates how close to the yield strength the bolt can be preloaded. Shigley and Lindeburg both recommend the following (conservative) values of preload:
where Fproof is the proof load of the fastener. The relationship between the proof load and the proof strength, Sproof, is:
Per Shigley, the proof strength is approximately equal to 85% of the tensile yield strength, Sty. Based on Sproof = 0.85·Sty, the recommended preload force as a function of yield strength is:
Considering that the above values are conservative, a general rule of thumb is to preload the fastener to 2/3 of the yield strength (i.e., %yld = 66.7%).
Preload Relaxation
There are many factors which can result in a "relaxation" or a loss of the preload applied during installation. Temperature fluctuations will result in expansion and contraction of the joint members and can cause either an increase or a decrease in the preload force depending on the relative lengthening and shortening between the fastener and the clamped parts. If the preload is achieved by applying torque to the bolt or nut, then this will result in torsion on the fastener which will act to increase the bolt tension and thus the preload force. Over time this torsion will dissipate and causing relaxation of the preload force. Other factors which contribute to preload relaxation include embedment and creep.
Preload relaxation can be mitigated through the use of thread-locking mechanisms including locking adhesives, lock nuts, lock washers, lock wire, and locking pellets/patches. Barrett provides a comprehensive treatment of thread locking mechanisms.
According to the Machinery's Handbook, preload relaxation occurs within hours after installation, and a preload loss allowance of approximately 10% is sufficient as a general rule.
Preload Uncertainty
The accuracy of the preload that is applied during installation is highly dependent on the tightening method employed. The following table is adapted from Barrett, from MIL-HDBK-60, and from the Machinery's Handbook:
| Tightening Method | Accuracy |
|---|---|
| By feel | ±35% |
| Torque wrench | ±25% |
| Turn-of-the-nut | ±15% |
| Load indicating washer | ±10% |
| Bolt elongation | ±3-5% |
| Strain gages | ±1% |
| Ultrasonic sensing | ±1% |
Torque to Obtain Preload
Many of the common tightening methods achieve the preload force by applying a torque to the nut or to the bolt head. When tightening a fastener with a torque wrench, which is one of the easiest and most common methods, the fastener is considered to be properly tightened once the specified torque is achieved. In this case, it is necessary to determine the torque value necessary to achieve the desired preload force in the bolt. This torque is calculated using:
where dnom is the nominal bolt diameter and FPL is the bolt preload force. KT is the torque coefficient and is calculated by:
where rt is the mean thread radius (the effective location of at which the thread friction acts), rc is the mean collar radius (the effective location at which the friction on the bearing face acts), ft is the friction coefficient between the thread surfaces, fc is the friction coefficient between the collar (bearing face) surfaces, λ is the lead angle, and α is the thread half angle ( α = 30°, per ASME B1.1, 10.1b). Barrett provides a good table of friction coefficients.
The value for rt is calculated as half of the mean bolt diameter, which is the average of the minor diameter and nominal diameter:
The collar area is the area of the bearing face of the part being rotated during installation (either the nut or the bolt head). The width across flats of a nut is typically 1.5 times the nominal diameter. In this case, the mean collar radius is calculated as:
The lead angle, λ, is calculated by:
where l is the lead per revolution ( = 1/TPI ).
Shigley provides a table of torque coefficients based on bolt condition, which has been adapted as shown below. When the bolt condition is unknown, a value of 0.2 is recommended for KT.
| Bolt Condition | KT |
|---|---|
| Nonplated, black finish | 0.30 |
| Zinc-plated | 0.20 |
| Lubricated | 0.18 |
| With Anti-Seize | 0.12 |
Because of the many variables that affect the value of the torque coefficient, any tightening method that measures a preload force indirectly via a torque value will be inherently inaccurate. It is for this reason that there is such a large uncertainty in preload accuracy when using a torque wrench.
Check out our bolted joint calculator based on the methodology described here.
- stress analysis of a bolted joint
- accounts for preload, applied axial load, and applied shear load
Joint Stiffness
The joint can be considered as a set of springs. The parts within the grip act as a set of springs in series, and the grip and the bolt act as springs in parallel. The joint can be modeled as shown below. Note that in the joint shown below there are only 2 parts in the grip; however, the number of parts is not limited to 2, and each part in the joint would be represented by a spring.
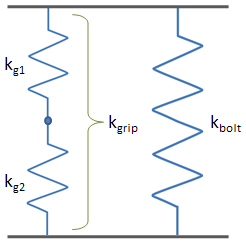
Each spring from the figure above has a stiffness of:
where A is the area, E is the elastic modulus of the material, and L is the length.
Bolt Stiffness
When a joint is assembled properly, the full shank of the bolt will be in the grip along with some length of threads. The stiffness of the shank is given by:
where Anom is the bolt nominal area, Ebolt is the elastic modulus of the bolt material, and Lshank is the length of the bolt shank.
The stiffness of the threaded portion in the grip is given by:
where At is the tensile stress area and Lthd.g is the length of the threaded portion within the grip.
The shank and the threaded portion of the bolt will act as springs in series, so that the effective stiffness of the portion of the bolt within the grip is given by:
Per ASME B18.2.1, the nominal thread length of inch-series bolts is found by:
The bolt shank length can then be found by:
The length of thread in the grip is found by:
where Lg is the grip length.
Grip Stiffness
The stiffness of the grip is calculated based on a simplified pressure-cone method as presented by Shigley. This method predicts the pressure distribution throughout the thickness of the grip. The pressure cone for a joint can be visualized in the diagram below.
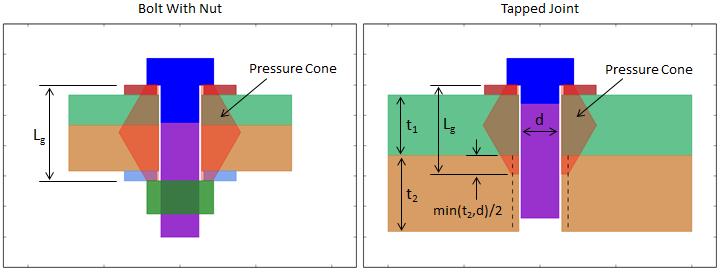
The portion of a part within the pressure cone is called a frustum. Every part in the grip will contain either 1 or 2 frustums. The stiffness of an individual frustum is given by:
where d is the inner diameter of the frustum, D is the smallest value of the frustum outer diameter, t is the frustum thickness, E is the elastic modulus of the material, and α is the angle of the pressure cone. Shigley recommends a value of 30° for α.
The height of the pressure cone depends on the grip length, Lg, which is the combined thickness of the parts being clamped in the joint (see the figure above). In a joint with a nut, the pressure cone starts under the head of the bolt and ends under the nut. The frustum diameters in this case can be easily determined using the diameters of the bearing faces. In a tapped joint, the pressure cone starts under the head of the bolt and ends in the threaded portion of the final plate. Per Shigley, the effective grip thickness of the final plate is given as:
where t is the plate thickness and dnom is the bolt nominal diameter. The frustum diameter at the end of the pressure cone is assumed to be 1.5·dnom.
The stiffness of the grip is calculated by considering the frustums to act as springs in series:
Grip Stiffness Simplification
Shigley provides an equation which calculates the correct grip stiffness on the condition that every part in the grip has the same elastic modulus. As long as this condition is true, then the grip stiffness calculated using the simplified equation below will be the same as that calculated using the full procedure where every frustum is considered individually:
In the equation above, E is the elastic modulus of the grip material, Lg is the grip length, α is the frustum angle (30°), dbh is the diameter of the bearing face under the bolt head, and d is the inner frustum diameter. The value for d can either be the nominal bolt diameter (for a more approximate result), or it can be the hole diameter of the most central part in the joint (for a more realistic result).
An even more simplified equation for the grip stiffness can be found if it is assumed that the bolt head diameter is 50 percent larger than the bolt nominal diameter (i.e., dbh = 1.5·dnom):
Check out our bolted joint calculator based on the methodology described here.
- stress analysis of a bolted joint
- accounts for preload, applied axial load, and applied shear load
Bolt Load vs Applied Load
The preload elongates the bolt and compresses the clamped parts. When a tensile load is applied to the joint, some portion of the applied load acts to relieve the compression in the clamped parts and the other portion further elongates the bolt. The portion of the applied load that is carried by the bolt is dependent on the relative stiffness of the bolt and the clamped parts. This relative stiffness is known as the joint constant, C:
The following is a representative diagram of bolt load as a function of the applied joint load:
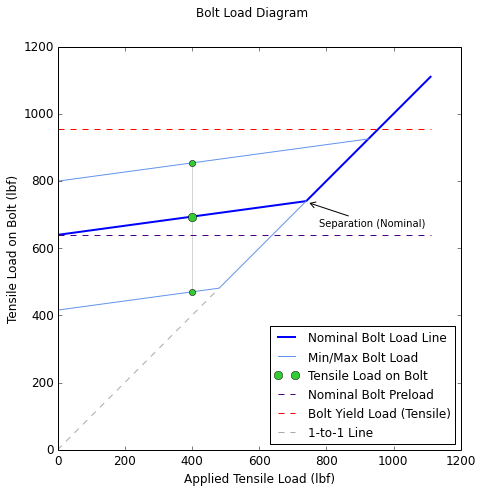
In the figure above, the x-axis is the tensile load applied to the joint, and the y-axis is the tensile load that exists in the bolt. When the applied load is zero, the tensile load on the bolt is equal to the preload force. As load is applied to the joint, the some of the applied load acts to relieve compression in the clamped parts and some of the applied load acts to increase the tension in the bolt. The bolt load line has a constant slope equal to the joint constant, C.
The nominal bolt load curve is shown as a thick solid blue line. The two lighter blue lines running parallel to the nominal curve are the minimum and maximum bolt load curves. The minimum curve accounts for preload uncertainty due to installation method as well as preload relaxation. The maximum curve accounts for preload uncertainty. In the curves above, a preload uncertainty of ±25% was used (corresponding to installation with a torque wrench) along with a preload relaxation of 10%.
Another curve to note in the figure above is the bolt tensile yield load line, shown as a horizontal red dashed line. This line indicates the value of tensile load on the bolt which will result in yielding. This line accounts for shear and bending, so any shear force or bending moments acting on the bolt will lower this line.
Joint Separation
The knee in the curve in the bolt load diagram above shows the point where the joint separates. At this point, the applied load is sufficient to separate the parts in the joint (all of the compression in the clamped parts has been relieved), and after this point any load applied to the joint is taken entirely by the bolt. The force that will result in separation of the joint is found by:
Note that the separation force will always be somewhat higher than the preload force.
Separation of the joint is a failure criterion, and a joint should be designed such that it will not separate during service. The factor of safety on separation is found by:
Forces on Bolt
The total tensile force on the bolt is due to 2 components: the preload force and the applied tensile load. The values of these components for each portion of the bolt load curve are found by:
| Joint Not Separated | Joint Separated | |
|---|---|---|
| Bolt tension due to preload, Fb.PL: | FPL | 0 |
| Bolt tension due to applied load, Fb.t.app: | C·Ft.app | Ft.app |
The total tensile force on the bolt is the sum of the tension due to preload and the tension due to the applied load, as determined from the table above:
Another way to express the total tensile force on the bolt is:
The shear force on the bolt is equal to the shear load applied to the joint:
A bending moment could exist in the bolt if there is a gap between the plates (e.g., due to a gasket) or if there are long spacers used in the joint:
where a is the moment arm. More discussion on the bending moment on the bolt is given in the Appendix.
Calculating Applied Forces
This reference on bolted joint analysis assumes that the tensile and shear forces applied to the joint are known. A discussion on how to calculate tensile and shear forces acting on individual bolted joints within a bolt pattern is provided in our Bolt Pattern Force Distribution reference.
Bolt Stresses
The stresses in the bolt are calculated per the equations shown in the table below:
| Preload Stress | Tensile Stress | Shear Stress | Bending Stress |
|---|---|---|---|
|
|
|
|
|
where At is the tensile stress area and As is the shear area (either the nominal area if the shear plane is in the shank or the minor area if the shear plane is in the threads).
We see that the bending stress is dependent on diameter, d, which is the either the nominal diameter if the maximum moment is in the shank or the minor diameter if the maximum moment is in the threads. If we consider the bolt to be a fixed-guided beam (as discussed in the Appendix), then we see that the maximum moment will occur at the boundary conditions of the bolt which are located under the head and at the start of the internal threads. Because maximum moment occurs in the threads, the minor diameter of the bolt should be used to calculate bending stress.
The von Mises stress is calculated by:
In the equation above, n is a load factor which is applied to the tensile, bending and shear stress but is not applied to the preload stress. The load factor is related to the factor of safety, with the difference being that it is a factor that is applied to the loads or stresses to ensure that the bolt stress remains below the allowable stress.
The factor of safety can be solved for iteratively by finding the value of the load factor at which the von Mises stress equals the allowable stress:
Check out our bolted joint calculator based on the methodology described here.
- stress analysis of a bolted joint
- accounts for preload, applied axial load, and applied shear load
Thread Shear
Thread shear is an important failure mode for a bolted joint, and it occurs when the threads shear off of either the bolt (external thread shear) or off of the nut or tapped part (internal thread shear). There should be enough engagement between the bolt threads and internal threads that the bolt fails in tension before the threads shear. This will ensure that the full strength of the bolt is developed (and therefore there is no "wasted" bolt strength), and it will avoid the task of drilling and re-tapping the internal thread. Thread shear should be considered for both the external (bolt) thread and the internal thread.
Length of Thread Engagement
The length of thread engagement is a dominant factor that determines whether the threads will experience shear failure. A rule of thumb is that a length of engagement equal to the bolt diameter is generally sufficient to protect against thread shear. However, shear calculations should always be performed as per the following sections to ensure safety.
In a bolted joint with a nut, as long as the bolt protrudes beyond the end of the nut then the length of thread engagement can be estimated by the nut height, hnut. In reality, there will be some loss of engagement due to the chamfering around the threaded hole in the nut.
In a tapped joint, the depth of the threads in the final part should be equal to the minimum of the tapped part thickness, tp, or the bolt nominal diameter, dnom, so the length of thread engagement can be estimated as the minimum of those values. Note that these estimates do not account for chamfering at the end of the bolt or around the threaded hole in the part.
The estimates for length of thread engagement in a bolted joint are summarized by the following equation. This value of LE should then be used to calculate factors of safety on external and internal thread shear.
External Thread Shear
The thread shear area for the external thread is determined from a cylindrical area with a height equal to the length of thread engagement, LE, and with a diameter equal to the pitch diameter, dp.ext. According to FED-STD-H28/2B, the thread shear area for an external thread is calculated by:
The shear stress in the external threads is calculated by:
where Fb.t is the total tensile force on the bolt, accounting for preload and the portion of the applied tensile load carried by the bolt.
The factor of safety on external thread shear with respect to the shear yield strength, Ssy of the thread material is calculated by:
The shear yield strength can typically by estimated as 0.577·Sty. The 0.577 value corresponds to the reciprocal of the √3 term that appears in the von Mises failure criterion. See Barrett for more details on estimates of shear allowables.
Internal Thread Shear
Internal thread shear is calculated in a similar manner as external thread shear. According to FED-STD-H28/2B, the thread shear area for an internal thread is calculated by:
where dp.int is the pitch diameter of the internal thread and LE is the length of thread engagement, which is calculated in the same manner as for the external thread shear.
The shear stress in the internal threads is calculated by:
The factor of safety on internal thread shear with respect to the shear yield strength of the thread material is calculated by:
Clamped Part Stresses
Failure of the clamped parts must be investigated when analyzing a bolted joint. There are several principal failure mechanisms for the clamped parts which are described in the following sections.
Pull Through
The tensile force applied to the joint will act to pull the parts above the location of the applied force through one another. In the figure below, the bolt head will act to pull through Washer 1, Washer 1 will act to pull through Plate 1, the Washer 2 will act to pull through Plate 2, and the nut will act to pull through Washer 2.
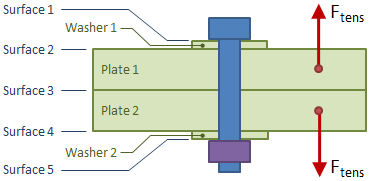
The relevant equations are:
| Area | Stress | Factor of Safety |
|---|---|---|
| Apt = πdotp |
|
|
In the table above, do is the outer diameter of the part pulling through, tp is the thickness of the part being considered, Ft.app is the applied tensile force, and Ssy is the shear yield strength of the material for the part being considered.
The shear yield strength can typically by estimated as 0.577·Sty. The 0.577 value corresponds to the reciprocal of the √3 term that appears in the von Mises failure criterion. See Barrett for more details on estimates of shear allowables.
Bearing
The preload force will act to cause each part to bear on the adjacent parts. For example, in the previous figure the bolt head and Washer 1 will bear against one another, as will Washer 1 and Plate 1.
| Area | Stress | Factor of Safety |
|---|---|---|
|
|
|
|
In the table above, do.min is the minimum outer diameter of the two parts bearing against one another, dh is the through-hole diameter of the part being considered, and Sby is the bearing yield strength of the part being considered. The bearing yield strength can typically by estimated as 1.5·Sty. See Barrett for more details on estimates of bearing allowables.
Fbear is the bearing force. The value for the bearing force on a surface depends on the location of that surface with respect to the location of the applied tensile force in the joint. In the p revious figure, Surface 3 is inside of the applied tensile force locations, and so that surface does not experience an increase due to the applied force. However, Surfaces 1, 2, 4, and 5 are all outside of the applied force locations and do experience an increase. If the bearing surface is inside of the applied force locations, then the maximum bearing force that surface experiences is simply the preload force. If the bearing surface is outside of the applied force locations, then the bearing force is increased by the applied force and the maximum bearing force experienced by that surface is equal to the tensile force in the bolt.
Pin Bearing
If the joint is loaded in shear, then the bolt may be pressed against the inner walls of the through-holes in the clamped parts.
| Area | Stress | Factor of Safety |
|---|---|---|
| Apb = dnomtp |
|
|
In the table above, dnom is the bolt nominal diameter, tp is the part thickness, Fs.app is the applied shear force, and Sby is the bearing yield strength of the material. The bearing yield strength can typically by estimated as 1.5·Sty. See Barrett for more details on estimates of bearing allowables.
PDH Classroom offers a continuing education course based on this bolted joint analysis reference page. This course can be used to fulfill PDH credit requirements for maintaining your PE license.
Now that you've read this reference page, earn credit for it!
Appendix
Hardware Sizes: Unified Inch Screw Thread
The tables for inch thread hardware have been moved here.
Hardware Sizes: Metric Screw Thread
The tables for metric thread hardware have been moved here.
Maximum Bending Moment on Bolt
The maximum bending moment on a bolt is given by:
where Fs is the applied shear force and a is the moment arm.
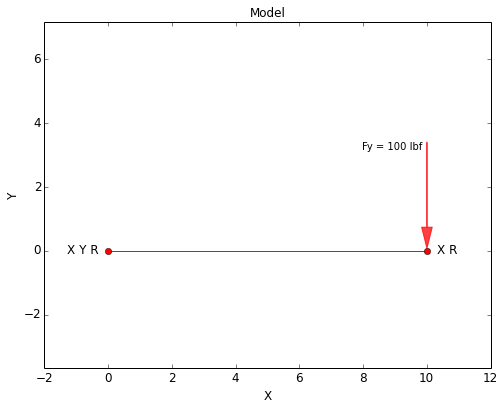
A bolt can be modeled as a fixed-guided beam (i.e., a beam with a fixed boundary condition at one end and a guided boundary condition at the other end). In the model below, the left end of the bolt is fixed (all degrees of freedom fixed) and the right end is guided (rotation and x-translation are fixed, but free to translate in y). A shear force of 100 lbf is applied to the right end.
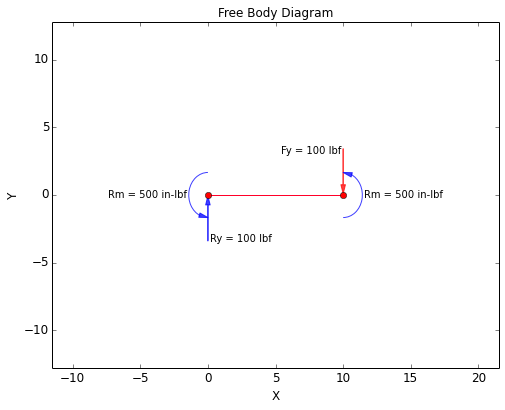
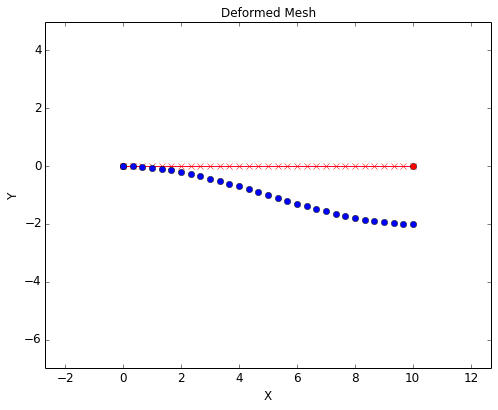
The Free Body Diagram (FBD) and deformed mesh for this case are shown below. If the model above were a cantilever beam, the moment due to the applied force would be taken entirely at the single fixed end. However, because the model is fixed against rotation at both ends, the moment is shared between the two ends of the bolt.
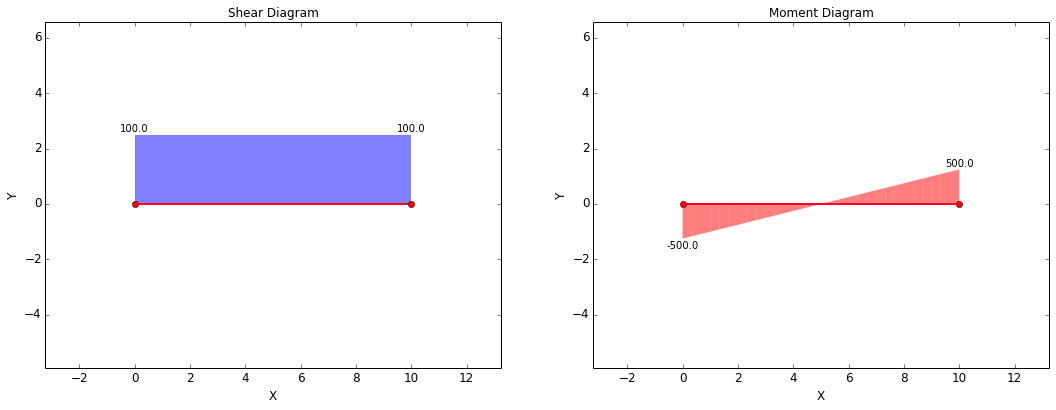
The Shear-Moment Diagram for this case is shown below:
References
General References:
- Barrett, Richard T., "Fastener Design Manual," NASA Reference Publication 1228, 1990.
- Budynas-Nisbett, "Shigley's Mechanical Engineering Design," 8th Ed.
- Chambers, Jeffrey A., "Preloaded Joint Analysis Methodology for Space Flight Systems," NASA Technical Memorandum 106943, 1995.
- Machinery's Handbook, 27th Ed., Industrial Press Inc., 2004.
- MIL-HDBK-60, "Threaded Fasteners - Tightening to Proper Tension," 1990.
- Lindeburg, Michael R., "Mechanical Engineering Reference Manual for the PE Exam," 13th Ed.
Specifications and Standards:
- ASME B1.1, "Unified Inch Screw Threads (UN and UNR Thread Form)," The American Society of Mechanical Engineers, 2003.
- ASME B18.2.1, "Square, Hex, Heavy Hex, and Askew Head Bolts and Hex, Heavy Hex, Hex Flange, Lobed Head, and Lag Screws (Inch Series)," The American Society of Mechanical Engineers, 2012.
- ASME B18.2.2, "Nuts for General Applications: Machine Screw Nuts, Hex, Square, Hex Flange, and Coupling Nuts (Inch Series)," The American Society of Mechanical Engineers, 2010.
- ASME B18.2.8, "Clearance Holes for Bolts, Screws, and Studs," The American Society of Mechanical Engineers, 1999.
- ASME B18.21.1, "Washers: Helical Spring-Lock, Tooth Lock, and Plain Washers (Inch Series)," The American Society of Mechanical Engineers, 2009.
- FED-STD-H28/2B, "Screw-Thread Standards for Federal Services," Federal Standard, 1991.
